Setup Find My iPhone: Follow the steps below to set up the free Find My iPhone feature. Already a MobileMe subscriber? Visit the MobileMe site to learn how to set up your device. 1. Make sure your iPhone is running iOS 4.2. If you’re creating a free account for the first time, you need an iPhone 4. 2. […]
Backup Your Application Data With AppBackup

AppBackup, developed by Scott Zeid, is a Cydia application that lets you backup and restore your application data on your iPhone, iPad, and iPod Touch. This includes saved settings, levels, achievements, etc. This is very handy if you are doing an upgrade to a new iOS firmware and want to setup your iDevice as a […]
Tutorial: Prevent iPhone 4 Baseband Update iOS 4.2.1 Upgrade
So you have an iPhone 4 with a baseband that is unlockable by UltraSn0w and you want to upgrade to iOS 4.2.1? You can easily do this with the latest version of Tiny Umbrella and GreenPois0n. Incoming search terms:upgrade iphone 4 basebandiphone 4 baseband upgradehow to upgrade baseband iphone 4how to keep basebandPrevent iPhone4 Baseband […]
Tutorial: Untether iOS 4.2.1 Jailbreak

Greenpois0n was just updated to untether all devices on iOS 4.2.1. Untethered means that you no longer have to hook your iDevice up to the computer to boot with a jailbreak. GreenPois0n is very easy to use but some people request tutorials so here we go. Please note that this jailbreak is for firmware 4.2.1. […]
Tutorial: What Is My UDID? (Unique Identifier)

Apple’s iDevices including the iPhone, iPod Touch, and iPad have a Unique Identifier which is UDID for short. This number is 40 digits and specific to the iDevice. It is similar to a serial number. Apple requires that each iDevice used for developmental and beta testing new iOS versions is registered in the Developer Portal. […]
How To Unlock The Mac App Store’s Secret Debug Menu

Hey guys, how’s it going? Well, it looks like the Mac App Store left some things hidden in the application (left over from Apple testing). To enable the menu, close the Mac App Store if it’s open. Then, open Terminal (search for it in Spotlight) and enter in the following: defaults write com.apple.appstore ShowDebugMenu -bool […]
iPhone Error Code 1013 Fix

It seems as though many people are having issues updating their iPhones to 4.2.1. They are getting the error code 1013 and are stuck at the iPhone recovery logo. This seems to be a common issue and is affecting many users. You can follow the discussion on Apple’s forums. The first thing that you should […]
Stop AutoPlay From Popping Up When You Plug Your iPhone, iPad, Or iPod Touch into Your Windows Computer
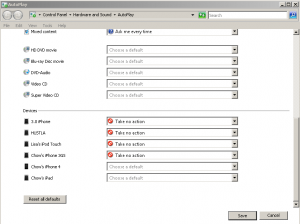
Here is the easiest was to stop that pesky AutoPlay window from popping up when you plug your iDevice in. When you first plug your iPhone, iPad, or iPod into your computer you will see a popup with like: t the bottom you can see a link that says “Set AutoPlay defaults in Control Panel.” […]
Simple Mobile iPhone MMS Fix

We have recently had a huge server crash and lost most of our data. Our Cydia repo is currently down, but you can manually fix your MMS with the Simple Mobile MMS Fix for iPhone below. This fix should work on iOS firmware 4.0 to 4.2.1+. UPDATE 2: If your phone is not jailbroken follow […]
T-Mobile iPhone MMS Settings For iOS 4
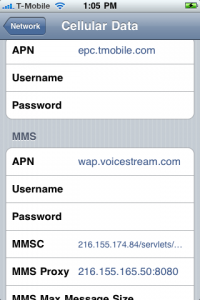
Earn a Free iPhone 4S. Click Here! Many people have been asking for the MMS settings to use for T-Mobile. This will work on all versions of the iPhone and any firmware. Whenever you restore your iPhone you lose the settings and since T-Mobile is not an official carrier in the US yet, you will […]