In Ubuntu 11.10, setting up AirPrint is easy.
1. Have a Standard install of Ubuntu Desktop 11.10 32-bit. I my case it was running under Windows 7 using Virtualbox.
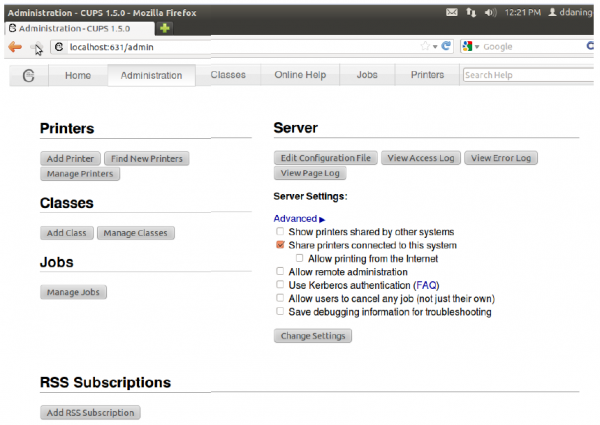
2. Go into the CUPS interface and make sure “Share published printers connected to this system” is enabled on the server settings. Use Firefox for this browser as shown below:
3. The Print Server is the Ubuntu computer that is directly connected to the printers.
4. On the server machine (the one the printer is attached to), open System -> Administration -> Printing. This will open the Printer Configuration window. OR you can open the following URL in your browser: http://localhost:631
5. Select Server in the menu bar, and then Settings. This will open the Basic Server Settings window.
6. Check the second box:
- Publish shared printers connected to this server
7. If this computer acts as both a Print Server and a client (it does need access to a printer connected to another computer), select also the first box, “Show printers shared by other systems”.
8. OK.
9. Right click the printer and check the Shared option, if not checked yet.
10. On the Printer Properties, make sure the Shared checkbox is check on the Policies tab.
11. If you have a firewall running, make sure you allow the needed ports (one of the is port 631). I didn’t need to do this on my default install.
12. Restart CUPS “/etc/init.d/cups restart” or reboot the computer, this is done automatically when you save changes in the GUI admin for CUPS that you use Firefox to Access.
13. Make sure your iPhone/iPad is on the same network.
14. On your iPhone/iPad, go into Safari or email and, print, and search for printers. Your new printer should be in there.
Incoming search terms:
- ubuntu airprint
- airprint ubuntu
- ubuntu airprint server
- airprint server ubuntu
- airprint on ubuntu
- ubuntu airprint setup
- airprint for ubuntu
- air print ubuntu
- ubuntu server airprint
- airprint ubuntu server

Leave a Reply